普通视图

Received before yesterday

Lasercutter Letterpress: reusable designs for letterpress printing blocks, stickers, & more

2025年3月2日 13:00

I’ve been experimenting with lasercutting type-high wood to make letterpress blocks for letterpress printing (read more & pretty pictures here). Since someone asked on Bluesky, I’m now sharing some of the recent files I’ve lasercut, which are free to use with a CC-BY-NC license, which means you need to credit me when sharing them (Amanda Wyatt Visconti / AmandaVisconti.com) and cannot sell them nor include them in a sold thing.

You can use these for stickers or other purposes; to lasercut them for printing on wood, lino, or other materials, reflect (flip) the images horizontally before carving, so they read correctly when pressed against paper with ink. Here’s an example of one of the images I flipped and lasercut into wood for letterpress printing use:

Photo of a block of wood in a lasercutter, being cut to show a historical illustration of a Luddite, and the text "critical tech! no 'innovation' serving profit over people". Photo is from after 5 total lasercutter passes. Photo digitally flipped for readability.

“made with <3 by” with checkboxes for trans ally or trans printer; & fill-in trans pride flag

Download as: SVG or PNG. (CC-BY-NC Amanda Wyatt Visconti.)

Adobe Illustrator design intended for creating letterpress printing blocks by cutting via lasercutter onto wood, to use to print the image to paper with ink; to achieve this, the black & white colors are inverted. The image will also need to be horizontally flipped, so that when the block is pressed to paper the inked image is legible; but for social media viewing I have left it unflipped. The design is the text "made with love by" followed by checkboxes next to the options "trans ally!" and "trans printer!", followed by the outline for a trans flag you can color in after letterpress printing

“made by a trans ally!” & “made by a trans printer!” with fill-in trans pride flag

Download as: SVG or PNG. (CC-BY-NC Amanda Wyatt Visconti.)

Adobe Illustrator design intended for creating letterpress printing blocks by cutting via lasercutter onto wood, to use to print the image to paper with ink; to achieve this, the black & white colors are inverted. The image will also need to be horizontally flipped, so that when the block is pressed to paper the inked image is legible; but for social media viewing I have left it unflipped. The design is “made by a trans ally!” text next to the outline of a trans flag, which can be filled in later with color

Download as: SVG or PNG. (CC-BY-NC Amanda Wyatt Visconti.)

Adobe Illustrator design intended for creating letterpress printing blocks by cutting via lasercutter onto wood, to use to print the image to paper with ink; to achieve this, the black & white colors are inverted. The image will also need to be horizontally flipped, so that when the block is pressed to paper the inked image is legible; but for social media viewing I have left it unflipped. The design is “made by a trans printer!” text next to the outline of a trans flag, which can be filled in later with color

“made by a trans printer!” on manicule with Erin Moore’s Vision font on “trans”

Download as: SVG or PNG. (CC-BY-NC Amanda Wyatt Visconti.)

Adobe Illustrator design intended for creating letterpress printing blocks by cutting via lasercutter onto wood, to use to print the image to paper with ink; to achieve this, the black & white colors are inverted. The image will also need to be horizontally flipped, so that when the block is pressed to paper the inked image is legible; but for social media viewing I have left it unflipped. The design is a pointing hand that says "printed by a trans printer!" The word "trans" is on the back of the hand, in Erin Moore's groovy Vision font.

“we are older than your laws and we will outlive them”

The text in this design quotes the text from CoyoteSnout’s art, which quotes an old Yiddish lyric with a 20th-century history of resistance/defiance to Jewish persecution and murder (“we will outlive them”) put into the context of trans rights (there have always been trans people).

Download as: SVG or PNG. (CC-BY-NC Amanda Wyatt Visconti.)

Adobe Illustrator design intended for creating letterpress printing blocks by cutting via lasercutter onto wood, to use to print the image to paper with ink; to achieve this, the black & white colors are inverted. The image will also need to be horizontally flipped, so that when the block is pressed to paper the inked image is legible; but for social media viewing I have left it unflipped. The design is “CoyoteSnout’s text “we are older than your laws & we will survive them” in an antique broadside-style typeface, all over a flag-shaped rectangle divided by by bars into 5 equal sections so it can be later colored in with trans or other pride flag color schemes

“Critical tech! No ‘innovation’ serving profits over people” + Luddite

This uses a personally digitally edited version of a public domain image from a historical illustration of a Luddite.

Download as: SVG or PNG. (CC-BY-NC Amanda Wyatt Visconti.)

SVG file of an Adobe Illustrator design intended for creating a letterpress printing block by cutting via lasercutter onto wood, to use to print the image to paper with ink; to achieve this, the black & white colors are inverted. The image will also need to be horizontally flipped, so that when the block is pressed to paper the inked image is legible; but for social media viewing I have left it unflipped. The design shows a historical drawing of “the general of the Luddites” edited to be easier to print from a letterpress block, next to the text “critical tech forever! / no 'innovations' serving profit over people.” in antique broadside-style font.

“glitch their systems”

Download as: SVG or PNG. (CC-BY-NC Amanda Wyatt Visconti.)

Adobe Illustrator design intended for creating letterpress printing blocks by cutting via lasercutter onto wood, to use to print the image to paper with ink; to achieve this, the black & white colors are inverted. The image will also need to be horizontally flipped, so that when the block is pressed to paper the inked image is legible; but for social media viewing I have left it unflipped. The design is “glitch their systems” in a pixelated old English font

Lasercutter Letterpress: making my own letterpress printing blocks—with lasers! and fire!

2025年3月1日 13:00

I’ve been experimenting with lasercutting type-high wood to make letterpress blocks for letterpress printing with, greatly helped by forum posts on the BriarPress.org letterpress community site about topics like type-high wood/shims and lasercutting viability (for example). I wrote up my work to share there in return, and wanted to blog it as well in case it can help others.

Here’s the best lasercut letterpress block I’ve made yet! I’ll update with a print once I next get to use the local Vandercook with it. Photo of a block of wood in a lasercutter, being cut to show a historical illustration of a Luddite, and the text "critical tech! no 'innovation' serving profit over people". Photo is from after 5 total lasercutter passes. Photo digitally flipped for readability.

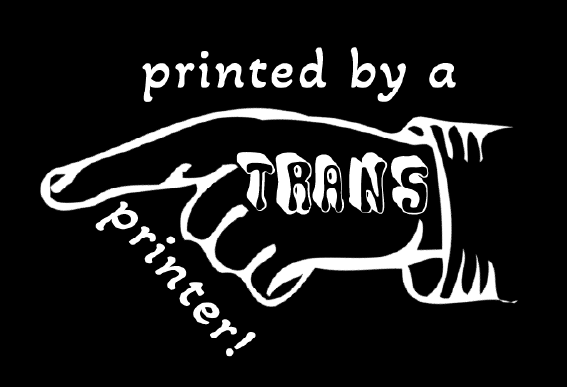
Here’s the art I used to make it, digitally flipped for readability (for non-letterpress folks: the cut block needs to be reflected horizontally, so when pressed to paper with ink the image comes out correctly): Screenshot of a black and white SVG image file of a historical illustration of a Luddite, and the text "critical tech! no 'innovation' serving profit over people". Photo digitally flipped for readability.

Fun images first, followed by in-depth details of what/why/how below

Skip past them for detailed info on why/what/how, for folks who want that. Any cuts that look like I made them wrong (that are readable left to right, thus would print wrong) are actually digitally flipped to make your reading easier; I just got was lazy about including a note to that effect on each one.

Earliest tests, using only 1 lasercutter pass

These produced pretty shallow cuts; they could be printed okay on a Vandercook, with some of the chatter because I was lazy and wanted to print a bunch of slightly-different-heights cuts at the same time without packing under individual cuts to balance them all, and also didn’t sand/seal these at all before printing (some of the chatter was from the height being shallow, though). I also deliberately kept some of the prints with more chatter, as I thought the wood-grain effect was neat, and wanted to remember to explore deliberately including it on some cuts in the future (as well as cutting deeper to avoid it on most cuts). Photo of a letterpress wood block inked in navy ink, with an image on it of a pointing hand that says "printed by a trans printer!" The word "trans" is on the back of the gand, in Erin Moore's groovy Vision font. The photo has been digitally flipped for readability. Photo of a letterpress print made on white paper with navy ink of a pointing hand that says "printed by a trans printer!" The word "trans" is on the back of the gand, in Erin Moore's groovy Vision font. A corona of woodgrain pattern surrounds it.

Photo of a box of 5 letterpress blocks cut from maple wood with a lasercutter Photo of a letterpress print made on white paper with navy ink of a pointing hand. A corona of woodgrain pattern surrounds it.

Photo of letterpress print blocks made from wood and inked in navy ink. One says "Zine Bakery" in a pixelated font next to an icon of a zine, and the other says "made by a trans printer!" in a serif font. The photo has been digitally flipped for readability. Photo of a letterpress print made on white paper from navy ink. The bottom line says "Zine Bakery" in a pixelated font next to an icon of a zine, and the top line says "made by a trans printer!" in a serif font.

This one is especially fun, as it started as a shape cut from craft foam using safety scissors and printed on a BookBeetle; I then scanned the print, cleaned that scan digitally, lasercut it into wood, and printed from that. Photo of a lasercut dog image with long legs, raised up on a block of wood

You can see the cut is fairly shallow: Photo of a lasercut dog image with ling legs, raised up on a block of wood, viewed from the side to show how the image sits higher than the rest of the wood Photo of a letterpress print block made from a wood blick on white paper inked in navy ink. It shows a very long-legged dog silhouette with a woodgrain texture. Photo of a letterpress print block made from wood and inked in navy ink. It shows a very long-legged dog silhouette.

Here’s the original BookBeetle/craft foam print the above cut came from: Photo of a cardboard sheet holding a craft foam cut-out of the silhouette of a very long-legged dog, covered messily in mottled fluorescent blue and pink ink from being used to print with a BookBeetle letterpress. Photo of a Bookbeetle letterpress-printed print of the silhouette of a very long-legged dog, printed in mottled fluorescent blue and pink ink on white paper. You can see some extra ink splots outside the silhouettes from where I didn't cut a frisket to protect the parts of the paper I didn't want printed on

Photo digitally flipped for readability. Sometimes there is flame; optimally, there is not any (power was too high and/or speed too slow): Photo of a rectangle of wood inside a lasercutter, blossoming with orange flame at one end; the words "zine" twice in arow are visible on the wood's surface (inage digitally flipped for legibility)

Testing different laser methods & settings

Next two photos are digitally flipped for readability, zoomed in to show text height from block surface. On the “zines zines zines” block, each word looks slightly different because a different lasercutter method was used on each, with raster cutting deepest (far right) but also burning most, cut (far left) cutting least, and etch in the middle. It probably didn’t help I used subpar random mystery Ebay wood…
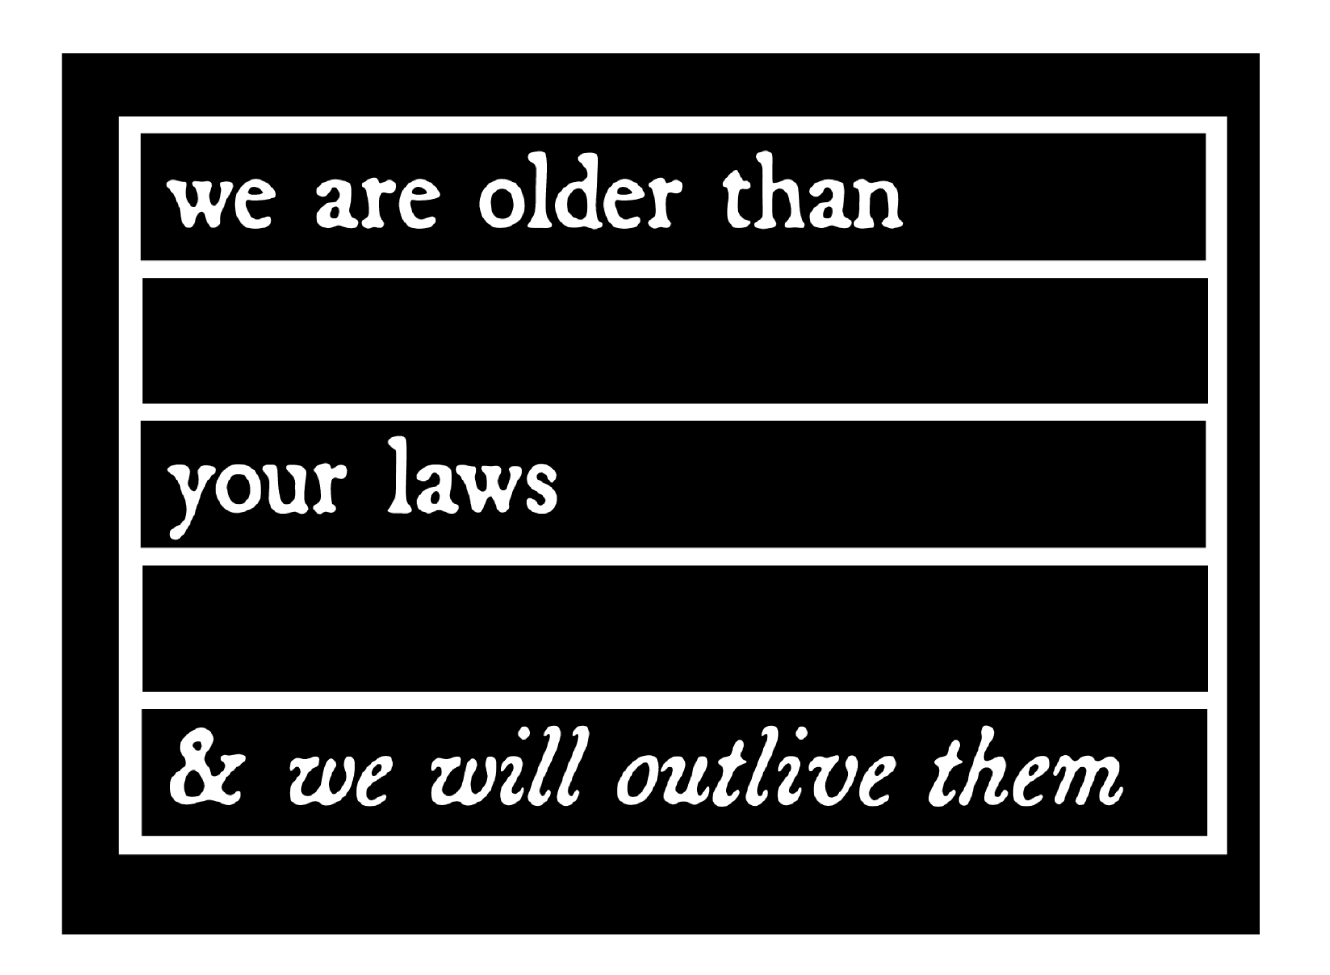
 Photo of two rectangles of wood cut into visa lasercutter to say "dogs" and "zines zines zines"; on the latter, each word looks slightly different because a different lasercutter method was used, with raster cutting deepest but also burning most, cut cutting least, and etch in the middle Photo of two rectangles of wood cut into visa lasercutter to say "dogs" and "zines zines zines"; on the latter, each word looks slightly different because a different lasercutter method was used, with raster cutting deepest but also burning most, cut cutting least, and etch in the middle. The photo is tilted to show the letters are cut to varying depths in the wood; all letters would be feelable with fingers, but only some are deep enough to easily get a clean letterpress print from them

Best outcome yet

“Critical tech: no ‘innovation’ serving profit over people.” 5 lasercutter passes, passes 1, 2 or 3?, 5 shown below (final photo digitally flipped for readability): Photo of a block of wood in a lasercutter, being cut to show a historical illustration of a Luddite, and the text "critical tech! no 'innovation' serving profit over people". Photo is from during the 1st of 5 eventual lasercutter passes. Photo of a block of wood in a lasercutter, being cut to show a historical illustration of a Luddite, and the text "critical tech! no 'innovation' serving profit over people". Photo is from after 2 or 3 total lasercutter passes. Photo of a block of wood in a lasercutter, being cut to show a historical illustration of a Luddite, and the text "critical tech! no 'innovation' serving profit over people". Photo is from after 5 total lasercutter passes. Photo digitally flipped for readability.

Why do this at all?

Because experimenting is fun; because you can make longlasting cuts from your own or other favorite images, including things you can’t buy historical or new cuts of; to design your own type (very advanced to do well); to have type in hard- or impossible-to-find (at least in the U.S.) languages and scripts (ditto). If you have free access to a good-enough lasercutter (eg thorugh a local library or college makerspace), the total cost can be very cheap in general (just the cost of evenly-cut maple blocks and one of many options for materials to make a shim bringing it up to type-high).

What lasercutter & settings?

I’m using the VLS 6.75 lasercutter (aka “Vader”) in Scholars’ Lab’s makerspace, for which I wrote my first zine (a cheatsheet on cutting and etching on acrylic using this lasercutter). You need to be trained by us before using it, but it’s available to anyone who can visit us in-person (no UVA affiliation needed!) and we offer both periodic workshops and 1:1 training by appointment. Non-commercial use is free, but you do need to bring your own materials to cut/etch (unlike our 3D printers, where we provide the filament for free for most non-commercial projects). Luckily, materials can be fairly inexpensive, starting from scrap cardboard, and even nicer looking wood can be fairly reasonable (e.g. a nicely finished bamboo cutting board from Ikea is a great lasercutting block, and costs ~$10).

The final 2 passes I did on the Luddite/critical tech cut above were set to 90 power, 90 speed, and 500 PPI, using 5 total complete lasercutter passes. I’ll continue tweaking those, and ideally I would have done maybe 7-8 passes but I ran out of time. (I varied the settings over the course of the 5 passes, but each took around 13 minutes, which included time the laser was doing nothing cutting the empty space above where my material was because I didn’t know how to move the start point lower, lol).

The SVG file producing the cut was color inverted so that the parts I wanted cut away were black, and the parts I wanted to remain raised were white. I also horizontally flipped the image so it would come out correctly readable when printed.

Finding a lasercutter

If you haven’t used a lasercutter before but are curious, I encourage you to ask a local or college/university librarian if they have or know of any nearby that can be used—with cheaper and smaller versions becoming more available, at least in the U.S. these seem to be popping up in more makerspaces in the last couple years. I’m not sure, but think the standing rather than tabletop kind are the ones with enough power (and safe venting requirements) to cut deep enough into hard woods, though other materials are also possible.

Materials

Lots of good posts if you search the Briar Press forum. For wood, end-grain maple seems to hit the sweet spot for price, hardness, results, but I’ve seen folks mention other options including cherry hardwood.

  • So far I’ve used type-high, maple wood blanks from Virgin Wood Press, McKellier, and Ebay old letterpress blanks with the lead piece chipped off (don’t put lead in a lasercutter, the fumes are toxic)
  • Non-type-high wood: get wood from anywhere cheaper (eg McClains) then add a shim (of wood, 3D printed block, tape, ?) to bring it to type-high
  • Other materials: acrylic (I’ve used this in a lasercutter, lovely results, very quick <2min cuts, can get fun seethrough neon colors!); harder (grey, not “EZ Cut”) or other labeled-laser-safe linoleum (thanks for advice from Ryan Cordell*)

What’s involved: basic

Basic lasercutter use is not overly complicated to learn, if you have some comfort using computer programs, especially saving image files containing letters or shapes from any drawing program. You use a drawing program such as Adobe Illustrator to create the lines or shape you want to cut or etch—any program that can save as an SVG file—give the lasercutter some info (e.g. what kind of material you’re cutting, how thick the material is), and position the material or image so the cuts happen in the right places, then click a button and it does the rest.

A more even and precise press (e.g. Vandercook, rather than hand-pressing or craft press) may be able to print cleaner from shallower-lasercut blocks.

What’s involved: intermediate

I’ve found the non-basic part to be figuring out the best lasercutter settings (such as speed and power) for the material you’re using. Harder materials take more power to cut into and to cut deeper. With wood, speed and power impact whether you get from zero burning, to small flames, to burnt wood.

So far, I’ve had the most success playing with these using cheap sample wood (though preferably of same/similar wood type and height to what you’ll ultimately use, so the settings work the same) to find the highest power (deepest cutting) and highest speed (finishes fastest) that don’t overly burn the wood, then doing multiple passes of the lasercutter (not touching the material at all in between, so that it remains exactly perfectly registered with the cuts going in the exact same places each time).

What’s involved: advanced

I’m not at any advanced stage doing this yet :) but lots of folks are, including users on the Briar Press forum, and some of the folks producing new wood type available via online stores too. Cordell recommended starting cuts on a lasercutter, then using a CNC router to dig out most of the wood farther away from the left-as-type-high bits faster and deeper than a lasercutter can.

There are also a number of folks creating blocks and type completely via CNC router; I took a very fun and informative virtual workshop from Ryan Molloy on this topic via Partners in Print last fall.

* P.S. Thanks to Ryan Cordell (Skeumorph Press) for generously sharing insights on his lasercutting letterpress experience. And unrelatedly, to the extremely generous Briar Press forum users platenman and jnbirdhouse, who’ve helped Scholars’ Lab be able to get closer to starting to teach full-size letterpress to the public!

Designing a Data Physicalization: A love letter to dot grid paper

2025年2月11日 13:00

Claudia Berger is our Virtual Artist-in-Residence 2024-2025; register for their April 15th virtual talk and a local viewing of their data quilt in the Scholars’ Lab Common Room!

This year I am the Scholars’ Lab’s Virtual Artist-in-Residence, and I’m working on a data quilt about the Appalachian Trail. I spent most of last semester doing the background research for the quilt and this semester I get to actually start working on the quilt itself! Was this the best division of the project, maybe not. But it is what I could do, and I am doing everything I can to get my quilt to the Lab by the event in April. I do work best with a deadline, so let’s see how it goes. I will be documenting the major steps in this project here on the blog.

Data or Design first?

This is often my biggest question, where do I even start? I can’t start the design until I know what data I have. But I also don’t know how much data I need until I do the design. It is really easy to get trapped in this stage, which may be why I didn’t start actively working on this part of the project until January. It can be daunting.

N.B. For some making projects this may not apply because the project might be about a particular dataset or a particular design. I started with a question though, and needed to figure out both.

However, like many things in life, it is a false binary. You don’t have to fully get one settled before tackling the other, go figure. I came up with a design concept, a quilt made up of nine equally sized blocks in a 3x3 grid. Then I just needed to find enough data to go into nine visualizations. I made a list of the major themes I was drawn to in my research and went about finding some data that could fall into these categories.

A hand-written list about a box divided into nine squares, with the following text: AT Block Ideas: demographics, % land by state, Emma Gatewood, # miles, press coverage, harassment, Shenandoh, displacements, visit data, Tribal/Indig data, # of tribes, rights movements, plants on trail, black thru-hikers
What my initial planning looks like.

But what about the narrative?

So I got some data. It wasn’t necessarily nine datasets for each of the quilt blocks but it was enough to get started. I figured I could get started on the design and then see how much more I needed, especially since some of my themes were hard to quantify in data. But as I started thinking about the layout of the quilt itself I realized I didn’t know how I wanted people to “read” the quilt.

Would it be left to right and top down like how we read text (in English)?

A box divided into 9 squares numbered from left to write and top to bottom:  
1, 2, 3  
4, 5, 6  
7, 8, 9

Or in a more boustrophedon style, like how a river flows in a continuous line?

A box divided into 9 squares numbered from left to write and top to bottom: 1, 2, 3; 6, 5, 4; 7, 8, 9

Or should I make it so it can be read in any order and so the narrative makes sense with all of its surrounding blocks? But that would make it hard to have a companion zine that was similarly free-flowing.

So instead, I started to think more about quilts and ways narrative could lend itself to some traditional layouts. I played with the idea of making a large log cabin quilt. Log cabin patterns create a sort of spiral, they are built starting with the center with pieces added to the outside. This is a pattern I’ve used in knitting and sewing before, but not in data physicalizations.

A log cabin quilt plan, where each additional piece builds off of the previous one.
A template for making a log cabin quilt block by Nido Quilters

What I liked most about this idea is it has a set starting point in the center, and as the blocks continue around the spiral they get larger. Narratively this let me start with a simpler “seed” of the topic and keep expanding to more nuanced visualizations that needed more space to be fully realized. The narrative gets to build in a more natural way.

A plan for log cabin quilt. The center is labeled 1, the next piece (2) is below it, 3 is to the right of it, 4 is on the top, and 5 is on the side. Each piece is double the size of the previous one (except 2, which is the same size as 1).

So while I had spent time fretting about starting with either data/the design of the visualizations, what I really needed to think through first was what is the story I am trying to tell? And how can I make the affordances of quilt design work with my narrative goals?

I make data physicalizations because it prioritizes narrative and interpretation more than the “truth” of the data, and I had lost that as I got bogged down in the details. For me, narrative is first. And I use the data and the design to support the narrative.

Time to sketch it out

This is my absolute favorite part of the whole process. I get to play with dot grid paper and all my markers, what’s not to love? Granted, I am a stationery addict at heart. So I really do look for any excuse to use all of the fun materials I have. But this is the step where I feel like I get to “play” the most. While I love sewing, once I get there I already have the design pretty settled. I am mostly following my own instructions. This is where I get to make decisions and be creative with how I approach the visualizations.

(I really find dot grid paper to be the best material to use at this stage. It gives you a structure to work with that ensures things are even, but it isn’t as dominating on a page as a full grid paper. Of course, this is just my opinion, and I love nothing more than doodling geometric patterns on dot grid paper. But using it really helps me translate dimensions to fabric and I can do my “measuring” here. For this project I am envisioning a 3 square foot quilt. The inner block. Block 1, is 12 x 12 inches, so each grid represents 3 inches.)

There is no one set way with how to approach this, this is just a documentation of how I like to do it. If this doesn’t resonate with how you like to think about your projects that is fine! Do it your own way. But I design the way I write, which is to say extremely linearly. I am not someone who can write by jumping around a document. I like to know the flow so I start in the beginning and work my way to the end.

Ultimately, for quilt design, my process looks like this:

  1. Pick the block I am working on
  2. Pick which of the data I have gathered is a good fit for the topic
  3. Think about what is the most interesting part of the data, if I could only say one thing what would that be?
  4. Are there any quilting techniques that would lend itself to the nature of the data or the topic? For example: applique, English Paper Piecing, half square triangles, or traditional quilt block designs, etc.
  5. Once I have the primary point designed, are there other parts of the data that work well narratively? And is there a design way to layer it?

For example, this block on the demographics of people who complete thru-hikes of the trail using annual surveys since 2016. (Since they didn’t do the survey 2020 - and it was the center of the grid - I made that one an average of all of the reported years using a different color to differentiate it.)

I used the idea of the nine-patch block as my starting point, although I adapted it to be a base grid of 16 (4x4) patches to better fit with the dimensions of the visualization. I used the nine-patch idea to show the percentage of the gender (white being men and green being all other answers - such as women, nonbinary, etc). If it was a 50-50 split, 8 of the patches in each grid should be white, but that is never the case. I liked using the grid because it is easy to count the patches in each one, and by trying to make symmetrical or repetitive designs it is more obvious where it isn’t balanced.

A box divided into 9 squares, with each square having its one green and white checkered pattern using the dot grid of the paper as a guide. The center square is brown and white. On top of each square is a series of horizontal or vertical lines ranging from four to nine lines.

But I also wanted to include the data on the reported race of thru-hikers. The challenge here is that it is a completely different scale. While the gender split on average is 60-40, the average percentage of non-white hikers is 6.26%. In order to not confuse the two, I decided to use a different technique to display the data, relying on stitching instead of fabric. I felt this let me use two different scales at the same time, that are related but different. I could still play with the grid to make it easy to count, and used one full line of stitching to represent 1%. Then I could easily round the data to the nearest .25% using the grid as a guide. So the more lines in each section, the more non-white thru-hikers there were.

My last step, once I have completed a draft of the design, is to ask myself, “is this too chart-y?” It is really hard sometimes to avoid the temptation to essentially make a bar chart in fabric, so I like to challenge myself to see if there is a way I can move away from more traditional chart styles. Now, one of my blocks is essentially a bar chart, but since it was the only one and it really successfully highlighted the point I was making I decided to keep it.

A collection of designs using the log cabin layout made with a collection of muted highlighters. There are some pencil annotations next to the sketchesThese are not the final colors that I will be using. They will probably all be changed once I dye the fabric and know what I am working with.

Next steps

Now, the design isn’t final. Choosing colors is a big part of the look of the quilt, so my next step is dyeing my fabric! I am hoping to have a blogpost about the process of dyeing raw silk with plant-based dyes by the end of February. (I need deadlines, this will force me to get that done…) Once I have all of those colors I can return to the design and decide which colors will go where. More on that later. In the meantime let me know if you have any questions about this process! Happy to do a follow-up post as needed.

A model heart

2024年8月22日 12:00

Collaboration with Dr. Zimmerman began in 2022 through a request to create a life-size, life-like model of a heart that he and other fellows could use to practice the movement of catheters inside the heart. Ideally the model would be clear and hollow. Due to time constraints the project was put on hold until the summer of 2023.

The original request was unable to be created due to the limitations of FFF printers and our lack of quality resin for our Form 2 printer.

So, like all good projects, we came up with the next best thing; a 3D printed, life-size heart with extra holes to make it usable for practice surgery.

I found a version online at https://www.printables.com/model/5612-anatomic-heart-multi-material, which provided the perfect model.

Burning Heart, Survivor

My 3D printed version came out pretty close!

Total Eclipse of the Heart, Bonnie Tyler

After viewing this version, Dr. Zimmerman had a few alterations in mind that would improve the model. I was able to pull the .stl files from printables.com into Autodesk Fusion for digital manipulation.

Unbreak My Heart, the Weezer version

Heart and Soul, T'Pau

The first attempt made sure the atrium and ventricle pieces could fit together and included most of the holes. I forgot a few, and Dr. Zimmerman had a couple more altercations, so it was back to the proverbial drawing board.

Heart of Glass, Blondie

The second attempt was “good enough”™ even if orange in color. I think I gave him a couple of versions in a more medical white or red.

Don't Go Breaking My Heart, Elton John and Kiki Dee

Dr. Zimmerman was very grateful for the heart models and noted that they would be useful for learning anatomy and showing patients what would be done to their hearts during surgery.

The .3mf files can be downloaded here for your printing enjoyment:

❌