阅读视图

Effortless Digital Humanities

When I first read Kenny Werner’s book Effortless Mastery: Liberating the Master Musician Within, I was in college studying jazz improvisation and musical performance. At the time, the book was powerful and transformative for its approach to thinking through performance anxiety and imposter syndrome— things I still struggle with in relation to musical performance. Recent conversations about GenAI and digital humanities left me wanting to revisit Werner’s approach to thinking through craft and difficulty.

The central conceit for Effortless Mastery is this: the degree to which we care about an activity can get in the way of our ability to do it. When we care deeply about doing something well, about performing at a high level, this sincere anxiety and the tension that follows interfere with our ability to prepare for the excellence we want to achieve. Approaching our craft with this heightened sense of the stakes reinforces a fraught relationship to our craft that comes out in practice, play, and performance. Effortless Mastery is about choosing a different path, centering mindfulness in our craft in a way that can be practiced. In the prototypical Effortless Mastery exercise, one sits at the piano and only practices a single note for 5-10 minutes a day. The goal is to approach this isolated note with such intention and care that it becomes effortless. Let your finger, in a childlike way, press down on a key with as little tension as possible. Only add new notes when the first one has become the most perfect and effortless thing that it could possibly be. According to Werner, performers will likely find this approach to practice excruciating. We feel like we have too much material to learn. Too much to do—not enough time. But Werner argues that, if approached diligently, his form of practice will actually pay dividends and elevate all parts of our performance. Our relationship to our instrument and to music will improve, and we will find it easier to enter a heightened state of flow and bliss as we perform. There are also affirmations that focus on changing the way you relate to the instrument.

I’m interested in how we can apply the same kind of approach to the work that we do in the academy. In some ways, the concept of effortless practice cuts against the way I tend to teach and write about DH. I’ve argued in the past that frustration is a feature for DH students. Learning is hard in a way that we can’t avoid, and we have to teach students how to live with these challenging emotions. But lately I’ve been thinking about how perception of difficulty can get in the way of our pedagogies, particularly as we all try to reckon with the impact of GenAI on our teaching. When a humanist sits down to learn something new, it can be easy to reach for GenAI as soon as they start to feel frustrated. Is it useful for them to sidestep challenging emotions? Would we rather they sit with the difficulty longer? How do we help students shift their own understanding of what is difficult and what is not? Finally, to talk back to myself, how might it change the possibilities students see for themselves if we framed DH instead as a space of effortlessness rather than one of frustration and difficulty?

The domains are different—how many of us would describe our DH work as a space of artistic bliss? But I still think there can be utility in thinking through the shape of an effortless digital humanities. What is the DH equivalent of putting your finger to a single note? What are the building blocks for all other digital humanities work? And how might we practice these techniques daily in 10 minutes to promote an effortless approach to doing so? To begin answering these questions for myself, I sat down at my laptop and mapped out how this sequence might work in my classroom. In what follows, I map out a way you might extrapolate this kind of approach over the course of a sixteen-week semester, slowly building up a daily practice in the spirit of developing an effortless digital humanities. Try it with your students and let me know how it goes.

Terminal

One of the first things I do when sitting down for DH work is open my terminal, so this is where my daily practice begins. The terminal is an essential tool for so many other DH activities, but it adds a layer of abstraction to learning that can take a while for students to overcome. Here are some ideas for playing one note on the terminal each day. Under each week I describe a sequence of activities meant to be performed daily, early each morning, in about 10 minutes. Each new week adds one or two new elements to the repeated sequence. Only advance to a new week when you feel you can perform the previous week with complete effortlessness. Feel free to repeat weeks. Better to go slow. And be sure to include (or adapt!) the light affirmations that I include. Our primary statement will be one directly from Werner’s text: “It is not hard, it is just unfamiliar.” A few caveats: in what follows, unless otherwise specified, code blocks represent lines that should be entered into the terminal. Throughout this post I am sharing MacOS terminal commands. Programming Historian has some useful lessons for those looking to adapt these for Windows. And, finally, things will, by design, become very repetitive. It is quite possible I will leave out a step while copying things over. Let me know if you find such a thing and I will edit accordingly.

  • Week 1:
    • Open the terminal. Say, “I have opened my terminal. It is not hard, it is just unfamiliar.”
  • Week 2:
    • Open the terminal. Say, “I have opened my terminal.”
    • Print out your current directory with pwd. Say “I am currently in my user folder. It is not hard, it is just unfamiliar.”
  • Week 3:
    • Open the terminal. Say, “I have opened my terminal.”
    • Print out your current directory with pwd. Say, “I am currently in my user folder.”
    • Change to your Desktop with cd Desktop. Confirm you are in your desktop with pwd. Say, “I have changed to my Desktop. It is not hard, it is just unfamiliar.”
  • Week 4:
    • Open the terminal. Say, “I have opened my terminal.”
    • Print out your current directory with pwd. Say, “I am currently in my user folder.”
    • Change to your Desktop with cd Desktop. Confirm you are in your desktop with pwd. Say, “I have changed to my Desktop.”
    • List out the contents of your desktop with ls. Say, “I am looking at the contents of my desktop. It is not hard, it is just unfamiliar.”
  • Week 5:
    • Open the terminal. Say, “I have opened my terminal.”
    • Print out your current directory with pwd. Say, “I am currently in my user folder.”
    • Change to your Desktop with cd Desktop. Confirm you are in your desktop with pwd. Say, “I have changed to my Desktop.”
    • List out the contents of your desktop with ls. Say, “I am looking at the contents of my desktop.”
    • Make a new folder with mkdir test_folder. Say, “I have made a new folder.”
    • Clean up your workspace by deleting the folder with rm -rf test_folder. Say, “I have deleted the new folder. It is not hard, it is just unfamiliar.”
  • Week 6:
    • Open the terminal. Say, “I have opened my terminal.”
    • Print out your current directory with pwd. Say, “I am currently in my user folder.”
    • Change to your Desktop with cd Desktop. Confirm you are in your desktop with pwd. Say, “I have changed to my Desktop.”
    • List out the contents of your desktop with ls. Say, “I am looking at the contents of my desktop.”
    • Make a new folder with mkdir test_folder. Say, “I have made a new folder.”
    • Change into the new folder with cd test_folder. Say, “I have changed into my new folder called test_folder.”
    • Return to your desktop with cd ... Say, “I have returned to my desktop.”
    • Clean up your workspace by deleting the folder with rm -rf test_folder. Say, “I have deleted the new folder. It is not hard, it is just unfamiliar.”

For many experienced DH practitioners, these steps would take maybe 10 seconds. But if you’re new to the terminal entirely each of these things could take quite a bit longer and cause a great deal of anxiety. Encourage students to move slowly, repeating each week’s steps regularly moving on to the next step. After several weeks, hopefully, they will feel a greater sense of comfort with the idea of what the terminal is, where to find it, and how to use it. Working incrementally in this way can take something from challenging to rote practice.

Git

Version control systems seem especially good for this kind of regular work. Git and GitHub are tools that students often find very difficult to conceptualize and master, but 90% of what you need to do can be handled by the same set of steps. Perhaps by making Git practice an everyday routine we can make more room for understanding the concepts. The next several weeks will build on the previous terminal sequence.

  • Week 7:
    • Open the terminal. Say, “I have opened my terminal.”
    • Print out your current directory with pwd. Say, “I am currently in my user folder.”
    • Change to your Desktop with cd Desktop. Confirm you are in your desktop with pwd. Say, “I have changed to my Desktop.”
    • List out the contents of your desktop with ls. Say, “I am looking at the contents of my desktop.”
    • Make a new folder with mkdir test_folder. Say, “I have made a new folder.”
    • Change into the new folder with cd test_folder. Say, “I have changed into my new folder called test_folder.”
    • Make this folder a git repository with git init. Say, “I have made this folder into a git repository.”
    • Return to your desktop with cd ... Say, “I have returned to my desktop.”
    • Clean up your workspace by deleting the folder with rm -rf test_folder. Say, “I have deleted the new folder. It is not hard, it is just unfamiliar.”
  • Week 8:
    • Open the terminal. Say, “I have opened my terminal.”
    • Print out your current directory with pwd. Say, “I am currently in my user folder.”
    • Change to your Desktop with cd Desktop. Confirm you are in your desktop with pwd. Say, “I have changed to my Desktop.”
    • List out the contents of your desktop with ls. Say, “I am looking at the contents of my desktop.”
    • Make a new folder with mkdir test_folder. Say, “I have made a new folder.”
    • Change into the new folder with cd test_folder. Say, “I have changed into my new folder called test_folder.”
    • Make this folder a git repository with git init. Say, “I have made this folder into a git repository.”
    • Make a few file in your folder with touch index.html. Say, “I have made a new html file.”
    • Confirm you have a new file to add in git with git status. Say, “I have shown that git acknowledges the new file.”
    • Return to your desktop with cd ... Say, “I have returned to my desktop.”
    • Clean up your workspace by deleting the folder with rm -rf test_folder. Say, “I have deleted the new folder. It is not hard, it is just unfamiliar.”
  • Week 9:
    • Open the terminal. Say, “I have opened my terminal.”
    • Print out your current directory with pwd. Say, “I am currently in my user folder.”
    • Change to your Desktop with cd Desktop. Confirm you are in your desktop with pwd. Say, “I have changed to my Desktop.”
    • List out the contents of your desktop with ls. Say, “I am looking at the contents of my desktop.”
    • Make a new folder with mkdir test_folder. Say, “I have made a new folder.”
    • Change into the new folder with cd test_folder. Say, “I have changed into my new folder called test_folder.”
    • Make this folder a git repository with git init. Say, “I have made this folder into a git repository.”
    • Make a few file in your folder with touch index.html. Say, “I have made a new html file.”
    • Confirm you have a new file to add in git with git status. Say, “I have shown that git acknowledges the new file.”
    • Add your new file to your git staging area with git add index.html. Say, “I have added my file to staging.”
    • Confirm you added the file successfully with git status. Say, “Git status shows that I did this successfully.”
    • Return to your desktop with cd ... Say, “I have returned to my desktop.”
    • Clean up your workspace by deleting the folder with rm -rf test_folder. Say, “I have deleted the new folder. It is not hard, it is just unfamiliar.”
  • Week 10:
    • Open the terminal. Say, “I have opened my terminal.”
    • Print out your current directory with pwd. Say, “I am currently in my user folder.”
    • Change to your Desktop with cd Desktop. Confirm you are in your desktop with pwd. Say, “I have changed to my Desktop.”
    • List out the contents of your desktop with ls. Say, “I am looking at the contents of my desktop.”
    • Make a new folder with mkdir test_folder. Say, “I have made a new folder.”
    • Change into the new folder with cd test_folder. Say, “I have changed into my new folder called test_folder.”
    • Make this folder a git repository with git init. Say, “I have made this folder into a git repository.”
    • Make a few file in your folder with touch index.html. Say, “I have made a new html file.”
    • Confirm you have a new file to add in git with git status. Say, “I have shown that git acknowledges the new file.”
    • Add your new file to your git staging area with git add index.html. Say, “I have added my file to staging.”
    • Confirm you added the file successfully with git status. Say, “Git status shows that I did this successfully.”
    • Commit your new file with git commit -m 'My first commit. Say, “I am committing my new file to git.”
    • Confirm you added the file successfully with git status. Say, “Git status shows that I did this successfully.”
    • Return to your desktop with cd ... Say, “I have returned to my desktop.”
    • Clean up your workspace by deleting the folder with rm -rf test_folder. Say, “I have deleted the new folder. It is not hard, it is just unfamiliar.”

At this point, I might have students continue to repeat these steps for several weeks. Again, an experienced practitioner could do this in no time at all. Newcomers will find this to be quite a lot. At some point, after enough days have gone by, things might start to get annoying. Good! You’re experiencing effortlessness. Only add new steps when you feel like what you have done so far is effortless. Remember: it is not hard, it is just unfamiliar.

Building a basic website

At this point, my bulleted list is getting overly complicated, so I’ll simplify things going forward by using shorthand and sandwiching the new steps inside of a “set up” and “clean up” phase. Refer above for the associated commands. It is probably clear where I am going at this stage: I think designing a basic website and understanding how to view it on your computer is another foundational DH skill. And we can make this sequence a very light daily activity.

  • Week 11:
    • Set up:
      • Open your terminal, change to your desktop, and make a new folder called “test_folder.” Change into it. Initialize a new git repository. Make a new file called index.html. Add and commit this change. Describe what you have done. Say, “It is not hard, it is just unfamiliar.”
    • New:
      • Add a new line inside your index.html file that says, “This is a basic webpage.” Describe what you have done.
      • Open that file in the web browser of your choice. Say, “I am viewing my html file in a web browser.”
    • Clean up:
      • Change back to your Desktop and delete the folder. Describe what you have done. Say, “It is not hard, it is just unfamiliar.”
  • Week 11:
    • Set up:
      • Open your terminal, change to your desktop, and make a new folder called “test_folder.” Change into it. Initialize a new git repository. Make a new file called index.html. Add and commit this change. Add a new line inside your index.html page and open it in a browser. Describe what you have done. Say, “It is not hard, it is just unfamiliar.”
    • New:
      • Stage your change with git add . Describe what you have done.
      • Commit your change with git commit -m 'Made a change'. Describe what you have done.
    • Clean up:
      • Change back to your Desktop and delete the folder. Describe what you have done. Say, “It is not hard, it is just unfamiliar.”
  • Week 12:
    • Set up:
      • Open your terminal, change to your desktop, and make a new folder called “test_folder.” Change into it. Initialize a new git repository. Make a new file called index.html. Add and commit this change. Add a new line inside your index.html page and open it in a browser. Describe what you have done. Say, “It is not hard, it is just unfamiliar.”
    • New:
    • Clean up:
      • Add and commit all changes.
      • Change back to your Desktop and delete the folder. Describe what you have done. Say, “It is not hard, it is just unfamiliar.”
  • Week 13:
    • Set up:
      • Open your terminal, change to your desktop, and make a new folder called “test_folder.” Change into it. Initialize a new git repository. Make a new file called index.html. Add and commit this change. Add a new line inside your index.html page and open it in a browser. Paste the basic skeleton of an HTML page into your index.html. Describe what you have done. Say, “It is not hard, it is just unfamiliar.”
    • New:
      • It’s a review week. Each day, write down comments, in your index.html file, explaining what one of the lines in the HTML file does.
    • Clean up:
      • Add and commit all changes.
      • Change back to your Desktop and delete the folder. Describe what you have done. Say, “It is not hard, it is just unfamiliar.”
  • Week 14:
    • Set up:
      • Open your terminal, change to your desktop, and make a new folder called “test_folder.” Change into it. Initialize a new git repository. Make a new file called index.html. Add and commit this change. Add a new line inside your index.html page and open it in a browser. Paste the basic skeleton of an HTML page into your index.html. Describe what you have done. Say, “It is not hard, it is just unfamiliar.”
    • New:
      • Each day, write down comments, in your index.html file, explaining what one of the lines in the HTML file does.
    • Clean up:
      • Add and commit all changes.
      • Change back to your Desktop and delete the folder. Describe what you have done. Say, “It is not hard, it is just unfamiliar.”
  • Week 15:
    • Set up:
      • Open your terminal, change to your desktop, and make a new folder called “test_folder.” Change into it. Initialize a new git repository. Make a new file called index.html. Add and commit this change. Add a new line inside your index.html page and open it in a browser. Paste the basic skeleton of an HTML page into your index.html. Describe what you have done. Say, “It is not hard, it is just unfamiliar.”
    • New:
      • Make a CSS file with “touch style.css”. Describe what you have done.
      • Link it to your index.html file by adding the following line within your <head> tag: <link rel="stylesheet" href="style.css">
    • Clean up:
      • Add and commit all changes.
      • Change back to your Desktop and delete the folder. Describe what you have done. Say, “It is not hard, it is just unfamiliar.”
  • Week 16:
    • Set up:
      • Open your terminal, change to your desktop, and make a new folder called “test_folder.” Change into it. Initialize a new git repository. Make a new file called index.html. Add and commit this change. Add a new line inside your index.html page and open it in a browser. Paste the basic skeleton of an HTML page into your index.html. Make a new CSS file and link it to your index file. Describe what you have done. Say, “It is not hard, it is just unfamiliar.”
    • New:
      • Change the background color of your <body> tag to be:
        body{
        background-color: red;
        }
        
      • Save your file. Refresh your browser to see the new page. Describe what you have done.
    • Clean up:
      • Add and commit all changes.
      • Change back to your Desktop and delete the folder. Describe what you have done. Say, “It is not hard, it is just unfamiliar.”

Again, step away from things if at any point the exercise starts to feel like they are causing effort or friction. Reduce what you’re asking yourself to do for the next session. I think you will find if you proceed like this for a week or two you will very quickly develop proficiency with a range of DH building blocks. A webpage with red background (my go-to example for teaching CSS because it is very obvious something has happened) might not feel very exciting to an advanced practitioner, but I would be immensely pleased with a student able to go from nothing to this level over the course of a semester.

These kinds of exercises might feel trite and meaningless, but you can’t put a price on confidence. Effortless fluency and literacy with the basics provide a strong foundation for more advanced study. Spend 5 to 10 minutes on them every day. As Werner would say, “What do you have to lose?” We can all find 5 or 10 minutes, and that unit of time is a small sacrifice that ultimately will not take that much away from other work. Wouldn’t it be great for students to approach their work with a sense of confidence that they can inhabit a DH space that works for them? Exercises like these can help our students make DH a daily part of their lives. Daily work building a personal, effortless digital humanities will prepare our students to face the bigger and more advanced problems they will inevitably face. They will do so with confidence that they can find the answers within themselves and their own process. The next time they reach for a GenAI prompt when faced with a problem, they just might pause and look inwards first.

  •  

Developing a Sustainable Summer Writing Practice

On June 2nd I’ll be giving a workshop for the PHD+ program here on how to develop a sustainable summer writing practice. This session will be one of the opening discussions for a daylong event that asks PhD students to take their research topic and transform it across a range of different formats: podcasts, websites, and zines. The goal for my part is to collect a number of different writing activities to show examples for how one might experiment with writing practice. For me, sustainable writing can be found through regular work, joy, and playing with constraints. To get there, I suggest students do the following:

  • Experiment with different formats for writing. For this I discuss otter.ai.
  • Distinguish between the different phases of the writing process and sit down with a clear goal in mind.
  • Scale up to a daily practice rather than experimenting to start with tons of words each day.
  • Incorporate free writing (hat tip to Sean Michael Morris here for his beautiful approach to the craft).
  • Incorporate stochastic practice as a means to jolt your creativity. I’ll use Peter Schmidt and Brian Eno’s Oblique Strategies deck here.

I then close with a short activity that asks students to brainstorm the different components for a practice of their own: format, location, frequency, amount, and method. After jotting a few ideas each for each category, I’ll guide them through a discussion of how to remix these components into something that works for them. Slides follow below. The particular deck theme I used was food themed, which felt appropriate.

Developing a Sustainable Summer Writing Practice What sustains you? My answer - Sustainable writing can be found through regular work, joy, and playing with constraints. Five verbs for sustainable practice - reformat, distinguish, scale, free, randomize Reformat - Experiment with different formats. Image of otter.ai interface Table of contents showing a book that was mostly dictated Distinguish - Separate the components of the writing process. Over image of bottles. Know your goal: brainstorming, drafting, revising, proofing, finalizing. Over image of bottles. Several different statuses a piece of writing might have. Over image of bottles. Scale - design a daily writing practice that grows. Over image of measuring cups. Describes a writing program that grows each week - one sentence daily, then two, then three. Over image of measuring cups. Free - practice free writing to get past barriers. Over image of a field. Over image of a field. Over image of miscellaneous food. Over image of miscellaneous food. Slide reiterates the discussion so far. What sustains you? Activity that asks participants to mix and match various components to develop a sustainable writing practice

  •  

Task Lists - Physical to Digital

A quick one today on how I manage my task list each day and the tools I use for doing so.

For years I have used Slack to manage my working life. If you click a single message you can select “remind me later” and select a date and time. I use this religiously, scheduling out reminders for particular times and dates. If I need to follow up on a thing, it gets a date. If I need more time to reply to a message, it gets a date. You can also schedule reminders for yourself separate from messages. So, if I have an overarching task, it gets a date and reminder. It’s not uncommon for me to open slack and get 10 notifications at 9:00 AM that tell me what I am supposed to be doing for the day. Here’s a glimpse at my reminders for today:

task list in slack as conveyed through a series of reminders.

This system has worked well for years. I rarely let anything slip, because I just file everything away as a reminder and snooze if necessary. But Slack recently changed how their reminders work. DISASTER. I can’t fully grasp how to reset the way it manages this system, but now it seems to be giving me double alerts for these notifications in a way that collapses them with DMs. It’s deeply irritating. While I’m sure I could figure a workaround, I decided it was time to disentangle this particular tool from my daily task management.

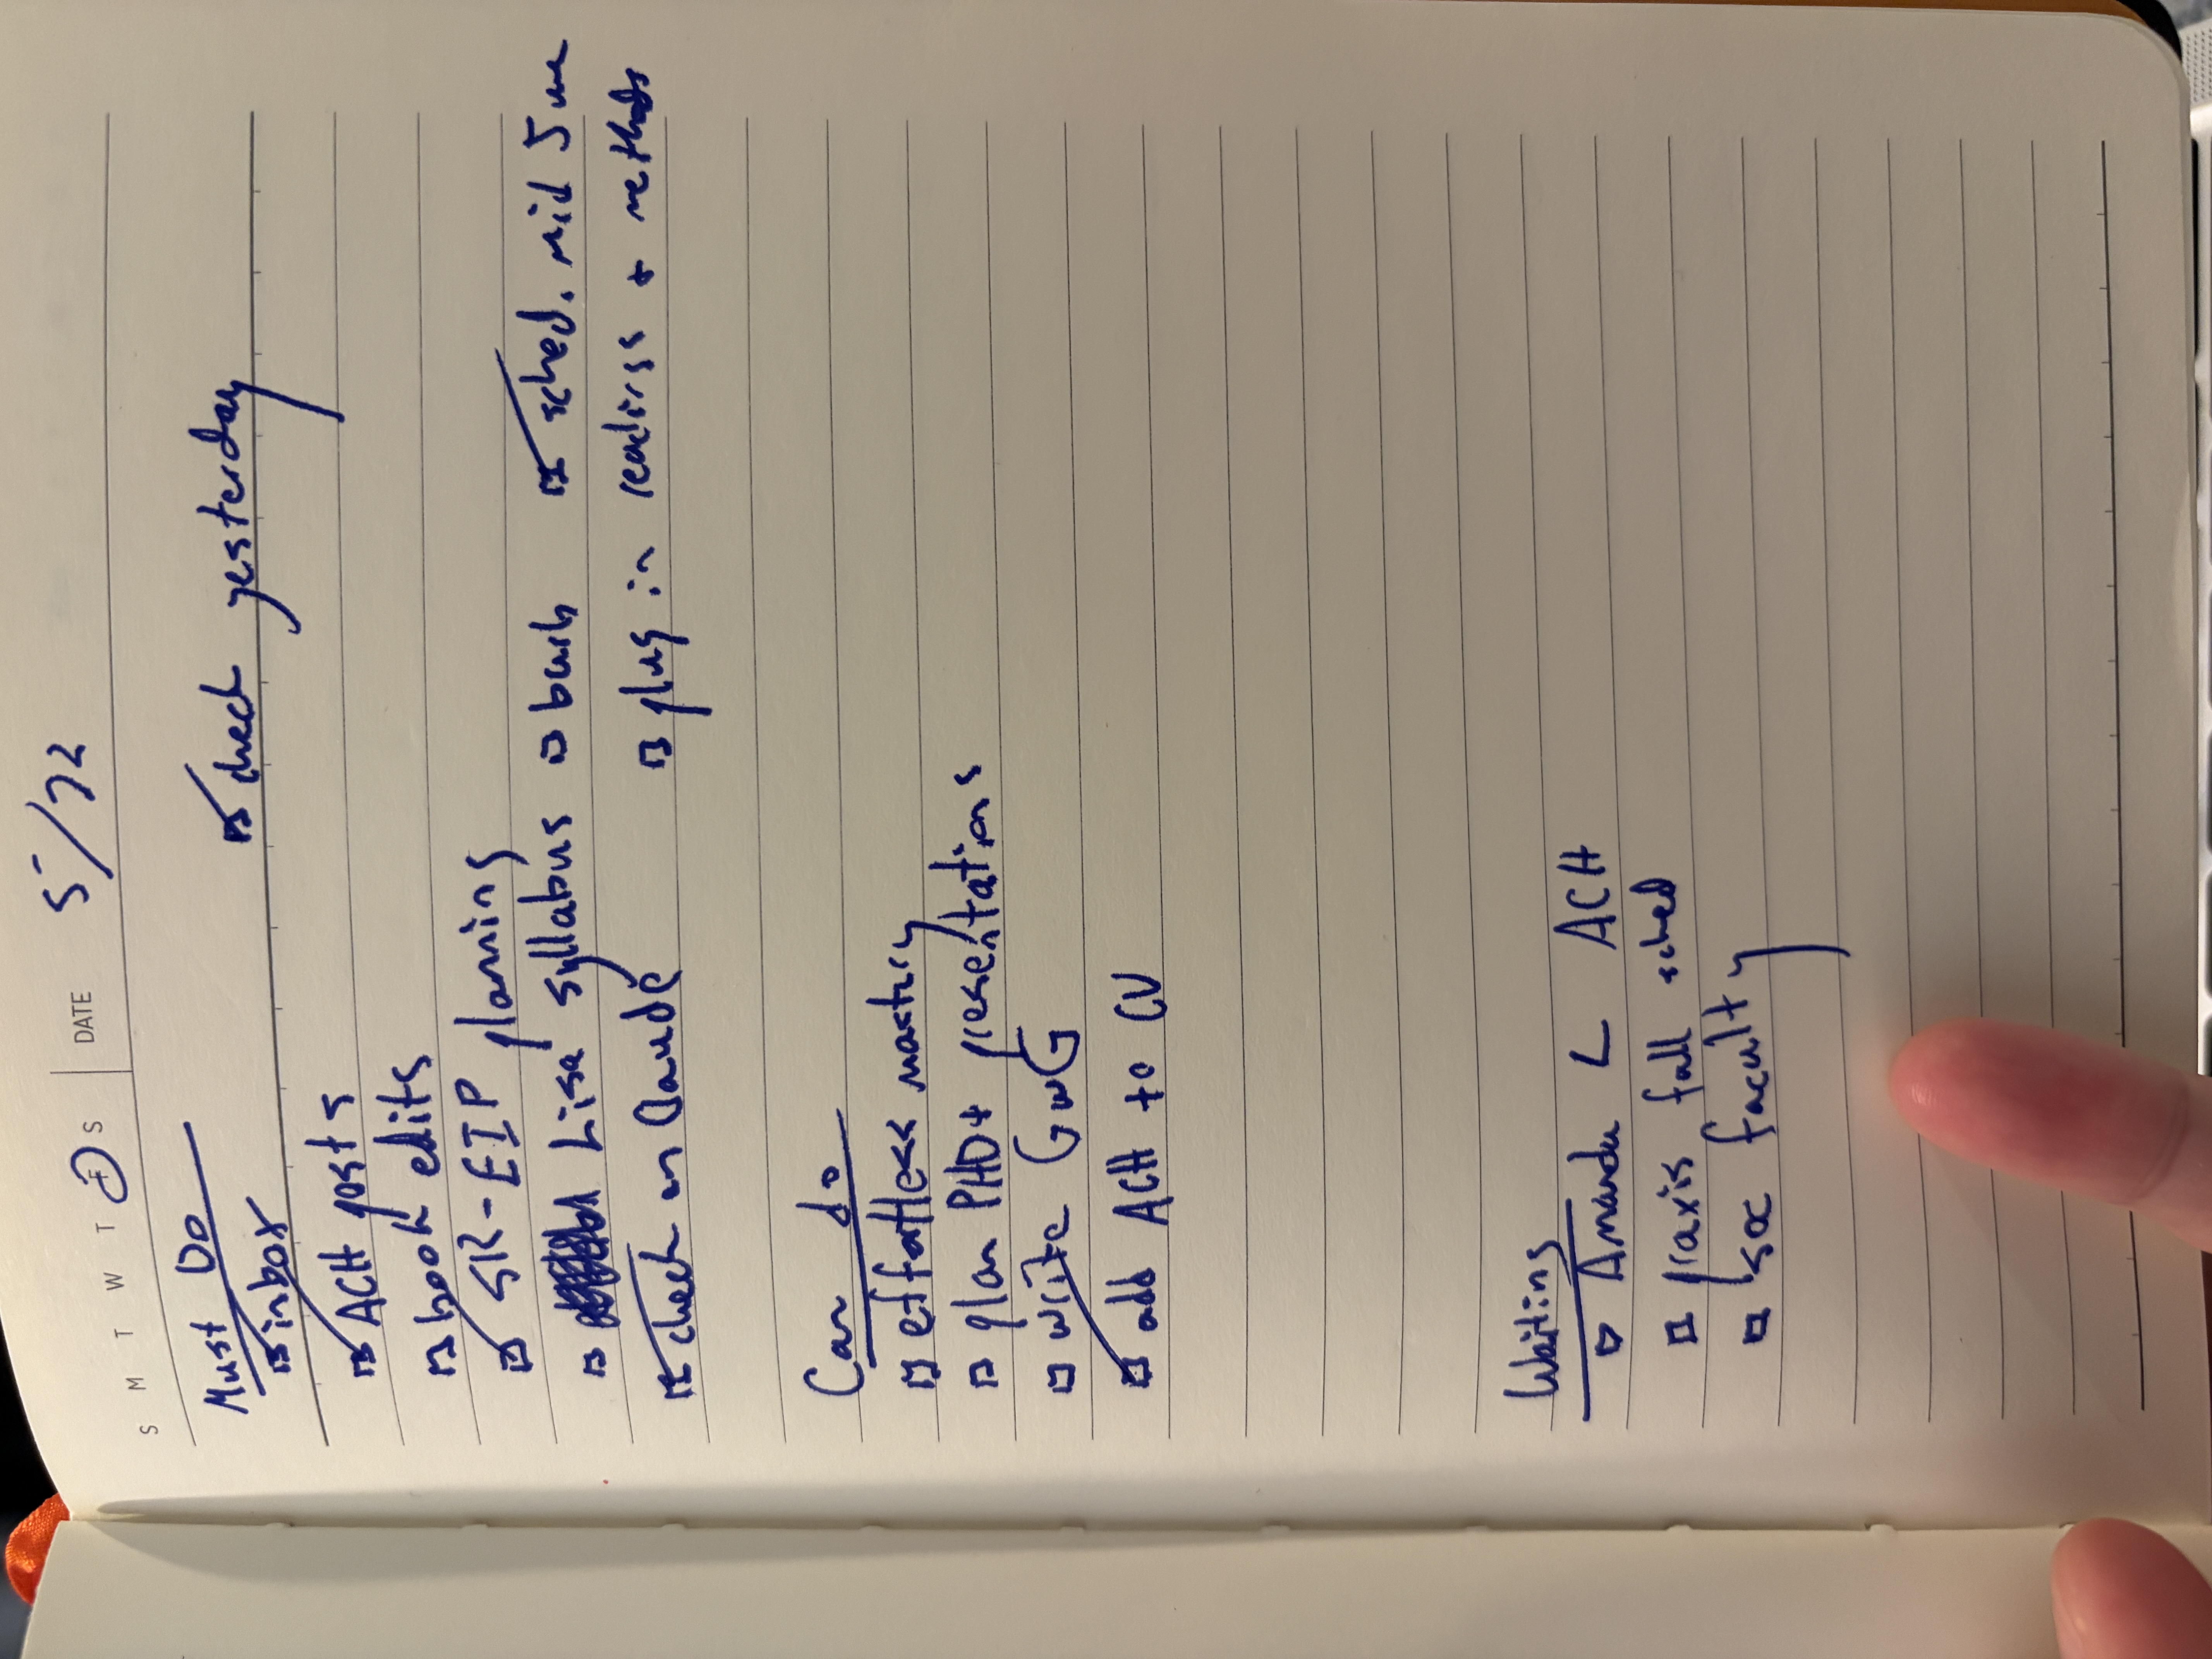
So, I’m experimenting with a physical notebook for the first time in at least a decade. Here’s my daily notebook for today:

task list in a notebook with separate sections for "can do," "must do," and "waiting."

I’ve tried such things in the past but never stuck with them for long, but this run seems to be sticking. In part, I think this is because of how I’ve made working with the notebook part of a daily ritual. Each day’s page is broken into three segments: must do, can do, and waiting. I start each day by looking at the previous day by looking at the previous page to see what needs to be moved over. I’ll then check my inbox and shuffle things around based on how answering email goes. This process gives me a sense of things that are urgent and those tasks that require actions from other people. I typically close out each work day by referring to the page once more and updating things. This process is helped along by the fact that I have found a particular set of pens that are deeply, unironically joyful to use. Working with them provides a meditative tactile sensation that grounds my start and end to each day.

Sharing all this is a tad embarrassing. I have discovered writing in a journal! I have terrible handwriting! Pens are nice! But I can’t emphasize enough what a shift this has been for my working life. It’s brought an embodied ritual to each day that I didn’t have before, and I’ve found it surprising how much energy can come from shifting this foundational part of my working rhythm. So, if you’re feeling stuck, it’s never too late to change. Your process can always find new shape if you give it new tools.

  •  

automated deploy with build-ghpages

Following the advice in Brandon Walsh’s warning, “anything that gets in the middle will keep you from blogging,” I simplified the steps to update and publish my website because the situation was getting a little miserable.

GitHub Pages is a great way to host your static sites free, if you don’t mind keeping your code public. It’s an especially smooth experience if you produce your site with Jekyll because it enjoys built-in support on this hosting platform. In other words, when you upload your Jekyll code to a public GitHub repository and activate GitHub Pages, the site will deploy automatically and become live within seconds (unless something goes wrong).

But I am using 11ty, a JavaScript-based framework, and while it’s common to host other kinds of static websites on GitHub besides Jekyll, it does add some extra steps. I was so close to publishing my website, I really didn’t want to stop for the ideal solution, so I created one main branch for deployment and another deploy one to serve the html files produced after 11ty parsed my root directory. This meant manually copying, pasting, and replacing old html files for newer ones between these 2 branches to keep the site updated. It got old quick. So quick changing this workflow became my top priority issue within the site.

Thankfully, I complained about it to Brandon at the Lab the other week, and he suggested I look for an 11ty version of a “Rakefile,” a document he uses to include custom website build and deployment instructions in his Jekyll website. Some digging pointed out that GitHub Actions might be the easiest way to go.

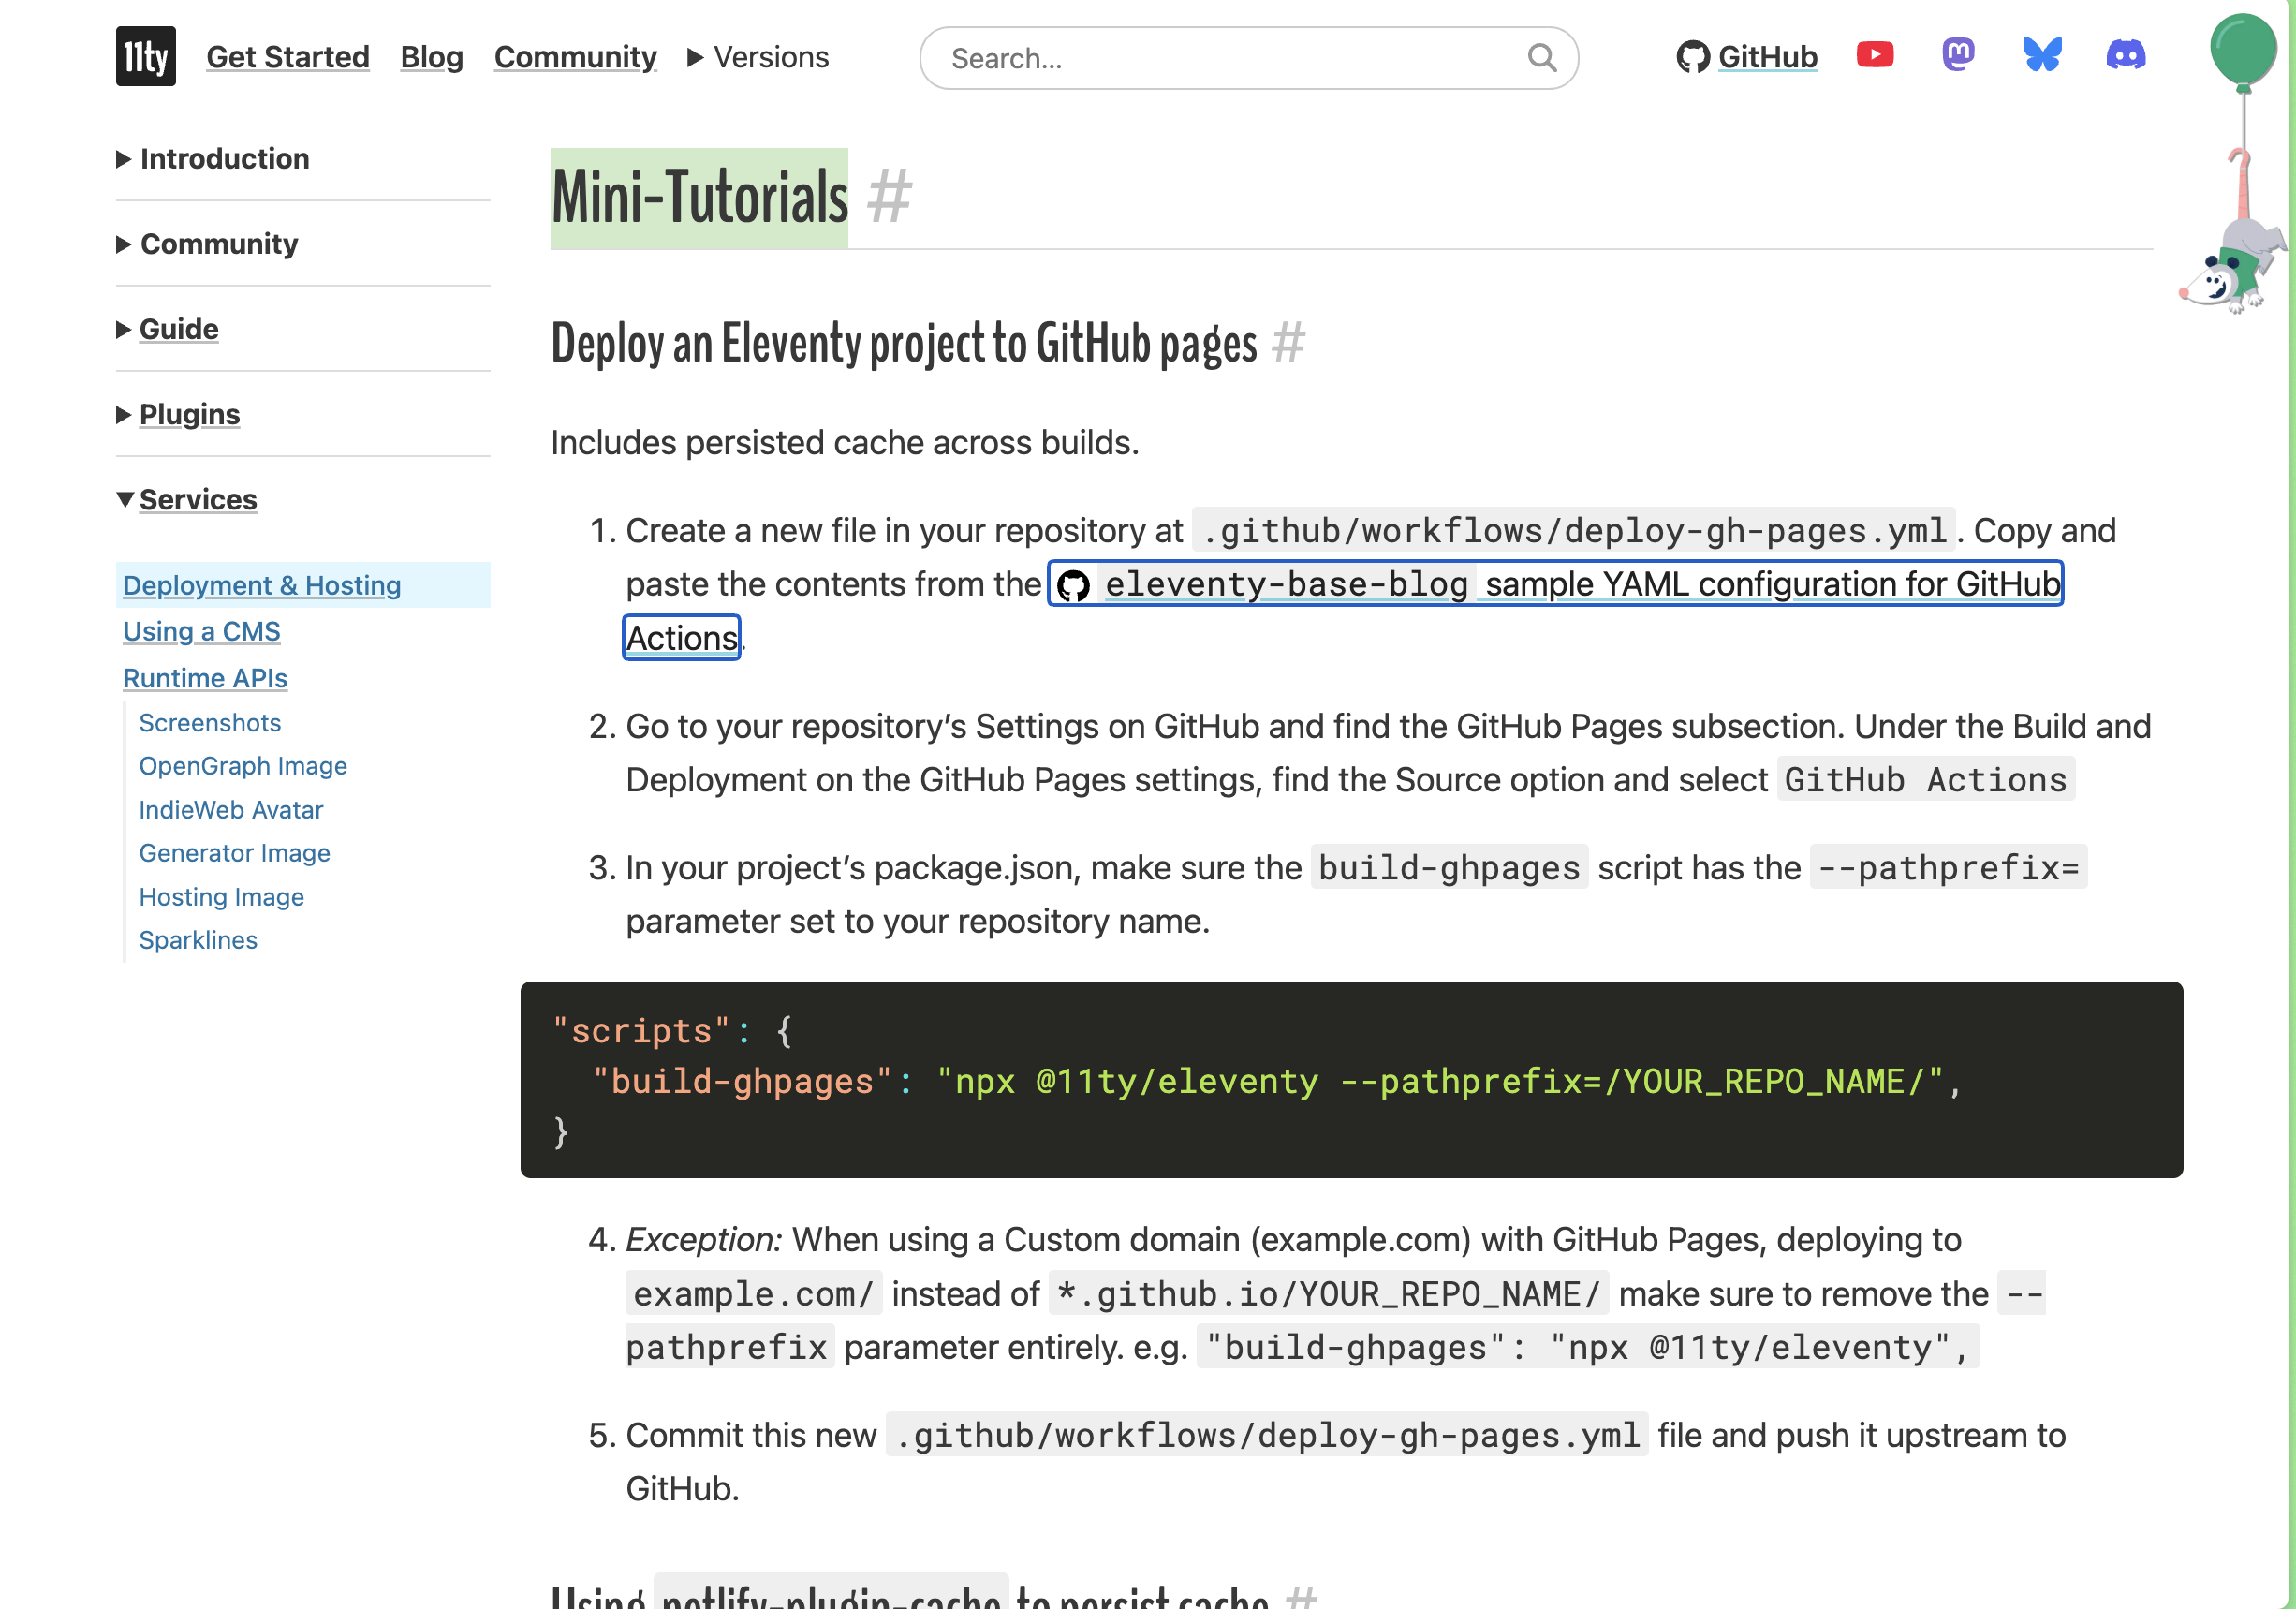
Using Actions involves changing a setting in your repository, a 1-line edit to your package.json, and a YAML file describing your desired build and deploy workflow for GitHub Pages to host your site. True, I didn’t know what my desired workflow file should look like, but Google turned up a useful Mini-Tutorial in the 11ty documentation that explains the full deploy process and shares a YAML example ready for you to copy and use within your web project.

11ty documentation page for Community Services.

Figure 1. Screenshot of the Mini-Tutorial section on 11ty’s documentation page showing how to deploy using GitHub Pages.

This worked, but I really didn’t know what was going on in the file at all, so I asked Claude Code 2.1.109 to make me a deploy.yaml file to deploy my 11ty site on GitHub Pages. The file that came out, frankly, works just as fine for my purposes the sample one. One notable difference was the simplicity of Claude’s YAML vs the sample one in the official 11ty documentation, which is thorough and filled with many options to understand.

Visual Studio Code GUI showing a section of 2 YAML files stacked for comparison.

Figure 2. Screenshot of the two deploy.yml versions I tested with my site, one generated by Claude Code and another by 11ty.

I stuck to using the sample YAML in 11ty’s docs because it’s safer and adds caching to the deploy workflow, for example.

I kept the simpler Claude Code deploy until I felt that I had a general sense of what was going on in the file. GitHub’s “Workflow Syntax” page was key to understanding what is going on in the file, and what the commands mean. It’s messy, though, and hard to navigate. I skimmed through 75% of it before I found the answer to one of the questions that bothered me the most: “What the heck is that actions/setup-node@v4 doing?” I knew it was setting up Node.js version 4, somehow, but how? Turns out it’s accessing and serving a contained version of Node used by through GitHub Actions to parse and deploy my 11ty site.

name: Deploy
on:
  push:
    branches: [main]

concurrency:
  group: pages
  cancel-in-progress: true

jobs:
  build-and-deploy:
    runs-on: ubuntu-latest
    steps:
      - uses: actions/checkout@v4
      - uses: actions/setup-node@v4
        with:
          node-version: 20
          cache: npm
      - run: npm ci
      - uses: actions/configure-pages@v5
      - run: npm run build
      - uses: actions/upload-pages-artifact@v3
        with:
          path: ./_site

  deploy:
    needs: build-and-deploy
    runs-on: ubuntu-latest
    permissions:
          pages: write
          id-token: write
    environment:
      name: github-pages
      url: $
    steps:
      - uses: actions/deploy-pages@v4
        id: deploy

Figure 3. Code block with the simpler GitHub Actions workflow generated by Claude Code 2.1.109 to build and deploy my 11ty website. A.k.a. deploy.yaml

  •  

Book Revision Workflow

I recently got word that my manuscript for Embedded Pedagogies: Digital Humanities Teaching and the Infrastructure of Change was accepted for publication with Open Book Publishers. As exciting as this is, there is still much work to do. I could not have asked for more thoughtful and generous peer reviewers, but even thoughtful and generous feedback still takes time to incorporate. One reader’s report especially requires a kind of work that used to give me a lot of difficulty when I was a graduate student. The substance of the report was that there were two critical conversations with which I needed to engage more deeply. The reader suggested thoughtfully that I needed to incorporate those conversations that critique the field of librarianship (#critlib especially) if I wanted to claim librarian as an identity. The other critique: my writing on artificial intelligence felt a little thin and needed to be built out. Also very fair. I hadn’t actually anticipated writing about AI, but it does feel more and more urgent the more time passes. Despite my own reluctance I found myself needing to read much more about generative AI.

So, here I have two areas in which I need to read more deeply. Such critiques can feel very overwhelming and abstract, and it is helpful to find ways to make them smaller and actionable. Experience has helped me towards a system that works for me, so I thought I would share a few thoughts here on my workflow for this research and revision process. While each step below does build on the others, I typically think of each phase as a separate component. I try to stick to a single goal when I sit down at my desk (or stand at my treadmill—more on that below).

Gathering

First, I gather a list of citations to explore. I might drop a bunch of links in a word doc, open a range of tabs, or print a stack of texts. The anonymous reviewer above suggested the #critlib Zotero library, which turned out to be an extraordinary resource. Reading through a collection of articles here took me to the Critical Library Pedagogy Handbook. Exploring that resource took me to the Journal of Critical Library and Information Studies. And working through that material took me on a deep dive into In the Library with the Lead Pipe. In each case, I started by skimming titles and abstracts just to get a sense of what could be relevant.

Reading

I read 2-3 articles per day from the stack created during the gathering phase (after all, one can only take in so much per day). As I go, I typically underline some things, underline and star others, and then underline and star and write CITE in capital letters next to others. At the end, I’ll make a few notes at the top of the article about whether or not the thing seems useful and about where I see the material fitting into the book. I typically do this work on the treadmill, which I mention for no other reason than to note how important it is for me to associate particular kinds of work with particular spaces and practices. In this way, my “to read” pile gradually morphs into a “read but needs to be transcribed” pile.

Lifting and Transcribing

At this point, I shift back to my computer. I have three folders there: “to transcribe,” “to integrate,” and “done.” For each article that I have read, I create a blank word document titled with the name of the author. I transcribe that article’s quotations with page numbers into its corresponding holding document, and I also assemble the actual, formatted citation for my references list. As this point, I am typically done with the actual, full text of the article. It exists for me only as a series of quotations, a citation, and a few notes to the effect of “mention in Chapter Three when you talk about the interview” or “more of an explanatory footnote than an actual citation to Chapter Four.”

Integrating

Only now do I actually open the manuscript itself. Given that is revision work for an actual, already extant manuscript, I typically have a pretty good idea of where things are likely to fit in and be useful. This phase involves integrating the new material into my text, stitching things together, and rewriting whatever components were complicated by the new references. Sometimes, this process is fairly seamless. Other times, this process involves substantial rewriting in light of the way the citations change my thinking about particular ideas. After the initial pass at integration, I make a note about the page numbers where I have revised new material. That way, I have a better sense of which pages to focus on during later editing.

Proofing

In this final phase, I make sure to return to things with fresh eyes. I will read more broadly than just the sections I have surgically edited, and I’ll hope to see where things fit, where they don’t, and what other edits might be needed to make things flow together. But the pages listed in the previous phase help me know where to focus.

Each of these phases feeds the others, so I am constantly moving forward. I feel as though I am making progress, and I also feel as though the big abstract task of reworking my argument to fit more closely into a particular critical conversation is more manageable and more doable. Importantly, each of these segments requires a different kind of work in ways that I appreciate. Transcribing and creating a citation require far less mental energy for me than reading or integrating. I welcome these variations.

Hopefully this is useful for seeing how I go about the revision process. Keep an eye out for Embedded Pedagogies, the text of which will be available print on demand and freely online. I am so grateful for the particular anonymous reader I describe above. It’s been enjoyable to dig into broad areas that overlap with my work but that were not top of my mind. I’ve learned a lot, and I think my work is much stronger for it.

  •  

Getting back on track

Alt text

The Train Moves On!

Progress is happening. Much of it reworking what I already did. End of year projects crept in and put this project on the back burner for a couple of weeks. But despite the delay, the train moves forward! And what once was done is now redone!

Servo Motors

For example, the servo motors. The first version worked, sort of. They didn’t move a full 180°, and they were kind of weak.

So I found new motors, bought a couple, and tested them out. That of course, required recreating the servo gear and the whole housing unit.

After many iterations of the servo gear…

Alt text Alt text

I dialed in the tolerances and sizing so the new servo horn/arm fits and stays in place. But just to be safe, I’ll be screwing in each of the servo gears.

Alt text

Holder

The new servo motor is bigger than the previous. That means the holder needs altering. Fortunately, I designed it measurements so that a quick change of a few select dimensions and the holder fits the new motor snug, but not as tight as a fat kid in the middle seat. Hence the screw.

Also note that I started writing the version number on the object.

I also opened up the back side so it is easier to install the gears, especially the servo gear. I tightened up the tolerances here, too.

Alt text (New version on the left.)

And here’s the new gear train all assembled with the new servo. It moves so much more cleanly and smoothly.

And just for fun, here are most of the parts I 3D printed so far.

Alt text

Moving On

This got me to the point of creating the states. I first needed to calculate how big this project was going to be more accurately.

So I counted all of the hexagons horizontally, and vertically to get a much better calculation than we had used in the past.

Alt text

I plugged these numbers into a spread sheet, and iterated over a few hexagon dimensions in order to see how big this map can be, or how small it needs to be. Two factors weighted the dimensions the most: 1) the maximum size that the laser cutter can cut, 2) the size of a doorway. I figure that I can cut the map out in multiple pieces, so the size of the laser cutter is not too much of an issue. But if this thing needs to travel, then it definitely needs to fit through a doorway. So that is really the limiting factor, because it will need to travel at some point in it’s existence.

Our original dimensions called for a map that was nearly 4 feet by 3 feet. Too large for the laser cutter, and too large to fit through a door.

A good size ended up being a hexagon that is 20mm from side to side, which creates a map about 30 inches long and 23 inches wide. A common, indoor doorway in the US is 30-32 inches wide. Such a table will definitely slide through at 23 inches wide.

All posts in this series:

Funding provided through a generous grant from UVA Arts Council. Alt text

  •  

When the Algorithm Disagrees With Your Eyes

Digital images are in constant motion. They traverse various platforms, feeds, databases, and archives, often reappearing in modified forms. Through my research on digital art, I have recognized this phenomenon as more than a mere feature of online dissemination. It constitutes both a methodological challenge and a perceptual issue.

What appears to be a single image may, in actuality, exist as a collection of various versions: cropped, compressed, recoloured, or reposted without proper attribution. Although these differences may seem insignificant at first glance, they give rise to a question that is more complex to answer than it initially appears.

      Under what circumstances can two images be considered identical?

That question became the basis of my assignment for the CodeLab course in my ongoing Praxis Fellowship Program. Using Python with the ImageHash and Pillow libraries in VS Code, I built a small tool to test how visual similarity might be measured across images that have changed through circulation. What started as an exercise became a way of thinking through something larger: what does it mean for a computer to recognize an image, and does that match what we mean when we say two images are the same?

The approach

The tool uses the imagehash library to compute perceptual hashes and compare images by visual similarity.1 Unlike cryptographic hashing, which changes entirely if even a single byte changes, perceptual hashing captures how an image looks. Two visually similar images should produce similar hashes; unrelated images should not.

After generating the comparison data, I modified the script to export results as JSON and render them as an HTML page. Instead of raw values, the interface ranked each image against the reference, displayed a distance score, and grouped results into categories from “nearly identical” to “different from the original.” The script processed files in the images/ folder, saved results to version_results.json, and generated output in results.html.

Image variant comparison

Figure 1. HTML interface showing ranked comparison of image variants against the reference image. See https://jimgaconcept.github.io/image-versioning-demo/

The dataset

The reference image is a digitized hand-drawn cartoon illustration made with pen and ink and watercolor on paper. This detail turned out to matter a great deal. I compared it to two modified copies (resized and compressed), one digitally recreated version, and three visually unrelated images, to test whether the tool could distinguish genuine variants from unrelated works.2

Results

The two modified versions, resized and compressed, both scored between zero and two, confirming their close relationship to the reference. The three unrelated images all scored above 20, well outside any similarity range. The digitally recreated version (Fig. 1) scored 18, placing it in the category that the interface labeled as different from the original.

That score of 18 was the result I did not expect, and the one worth thinking about most carefully.

What the computer sees, and what we see

The recreated image and the original share the same subject, composition, and color palette. A human viewer encountering both would almost certainly recognize them as versions of the same thing. The algorithm did not. Scoring 18, it placed the recreation closer to the unrelated images than to the two modified copies, which scored between 0 and 2.

The reason lies in what each image actually is at the data level. The original is a scan of a physical drawing, and its pixel data carries the texture of its medium: the grain of the paper, the way ink spreads at the edges of marks, the tonal variation of pigment on a physical surface. The digital recreation was built entirely within Photoshop and saved as a JPEG. Even a faithful digital reconstruction is made from digital brushes and algorithmically generated marks. There is no paper grain, no ink bleed. The two images look the same to us, but their underlying data structures are built from entirely different material.

This is a version of what computer vision researchers call the cross-depiction problem: the gap between human visual recognition, which operates on meaning and composition, and machine recognition, which operates on statistical patterns in pixel data. My experiment gave that abstract problem a specific, personal form. What appears identical to the human eye may share almost nothing in common at the data level. The computer is not seeing the image. It is reading a numerical structure, and two images that represent the same thing visually can be built from entirely different data, depending on how and where they were made.

This relates to a broader discourse within the field of digital humanities. As Drucker (2013) has articulated, digitization constitutes not merely a neutral representation but rather a form of interpretation. Factors such as resolution, lighting conditions, and the medium of capture all influence the transformation of an image into data.3 My findings exemplify this argument concretely. The scanned watercolor and the Photoshop recreation are not simply two variants of the same image; rather, they represent two distinct interpretations, which the algorithm processes accordingly.

If we are building archival systems or image databases that rely on computational similarity to group and relate works, we need to ask whose sense of “the same image” is being encoded. A tool trained on pixel-level data will consistently separate a scanned physical artwork from its digital recreation, not because they are different images in any humanistic sense, but because they are different kinds of data.

Limitations and what comes next

Perceptual hashing assesses visual similarity at the data level. It does not establish authorship, confirm provenance, nor consider contextual factors. Outcomes may also differ based on the specific hashing algorithm employed, as various implementations assign different weights to visual features. This tool serves as one component within a broader interpretive framework, rather than substituting human judgment.

This assignment illuminated a perception that is both straightforward and profound. It is evident that the computer and the human eye do not observe the same aspects, even when examining the same image. The disparity between data and meaning represents the realm where the most compelling inquiries within digital art history reside. As Burdick et al. (2012) suggest, the significance of computational tools in the humanities lies not in their capacity to resolve questions, but rather in their ability to render certain questions newly answerable.4 This experience has prompted a question I was previously unaware of having.

The live output and ranked visualization are at the project web interface. Full code is on GitHub.


  1. The imagehash library was developed by Johannes Buchner: https://github.com/JohannesBuchner/imagehash. Distance between hashes is computed using Hamming distance. See Hamming, R.W. (1950). Error detecting and error correcting codes. Bell System Technical Journal, 29(2), 147–160. doi:10.1002/j.1538-7305.1950.tb00463.x 

  2. The distance thresholds used (0 for near-identical, 1–5 for minor modification, 6–10 for significant transformation, above 10 for visually distinct) are derived from standard imagehash benchmarks and calibrated through iterative testing against the dataset. 

  3. Drucker, J. (2013). Is there a “digital” art history? Visual Resources, 29(1–2), 5–13. doi:10.1080/01973762.2013.761106. The argument that digitisation is interpretive rather than neutral runs throughout the article and is developed across pp. 5–8. 

  4. Burdick, A., Drucker, J., Lunenfeld, P., Presner, T., and Schnapp, J. (2012). Digital_Humanities. MIT Press. The claim is consistent with the book’s central thesis; p. 14 is the closest anchor. 

  •  

Professors HATE This One Weird Trick for Summarizing Your Research

Professors HATE This One Weird Trick for Summarizing Your Research

There’s an old story, almost certainly apocryphal, about former British Prime Minister John Major asking Boris Yeltsin to describe the Russian economy in one word. Yeltsin said it was “Good.”

Seeking a bit more detail, Major asked Yeltsin if he could describe it in two words. Yeltsin replied, “Not good.”

Major finally asked for a three-word summary. Yeltsin’s response? “Not good enough.”

While the exchange is most likely a myth, there is something irresistible about its structure, and it was rattling around in my head during a recent session of my dissertation seminar.

During the break, I asked someone to sum up their partner’s dissertation in one word. They said: “Empathy.” I relayed the Yeltsin joke and we decided to test whether the structure held up in summarizing academic research. Two words: “Not empathetic.” Three words: “Not empathetic enough.” Gabby, whose research is about depictions of madness in modernist literature, thought about it for a second and said: “Yeah, that’s actually not a bad summary.”

We started going around the room with it. Spencer, who is working on trans bibliography, offered “hermaphrodite” as her one-word summary, which yielded “not hermaphrodite,” and then “not hermaphrodite enough.” Applied to my own dissertation, which focuses on contemporary poems written from the perspective of animals, I get:

Animal.

Not animal.

Not animal enough.

Which, for a 3-word summary of what is supposed to be a book-length scholarly work investigating the strategic deformation of syntax, figuration, and sound that poets undertake in order to make language register as issuing from a nonhuman consciousness, is pretty good.

The question, of course, is to what extent “not X enough” is actually a useful model for summarizing research and to what extent it just feels like it works because the rhythm is satisfying. But I do think there’s something real going on in the unfolding of X, not X, not X enough. So many research projects, across disciplines, are fundamentally about some quality or condition that is absent, insufficient, or misrecognized. The three-word version locates a gap, names an inadequacy, and implies a standard that hasn’t been met. It’s a tiny argument. It can’t work for everything. But it’s a fun test and I’d argue it extends even beyond academic research to artistic projects more broadly.

So, does this method work for summarizing your research or current project? Does it not work? Does it not work well enough?

  •  

Nine things for nine years

I blinked and realized that Amanda Wyatt Visconti and I have been at the Scholars’ Lab for nine years as of April 24, 2026. Time flies. We typically celebrate by eating or drinking something sweet in the Lab (I’m still vibrating from the cream soda we had half a decade ago). We weren’t able to do so this year, so I thought I would share a quick post to mark the last nine years.

Nine things I’ve learned

  1. Drink a glass of water and put both feet on the ground.
  2. Don’t over-engineer things.
  3. Slow down and appreciate.
  4. Some things get easier. Some will not.
  5. Write it down. It will be helpful for someone. That someone might be you.
  6. Snacks always help.
  7. Be explicit about what you need and what you don’t.
  8. There are limits.
  9. Structures give shape. Structures can be changed.

Nine memories to hold onto

  1. Amanda biting into a lemon after eating miraculin.
  2. The moment when each student steps into their own expertise.
  3. Shane saying, “agenda item: be better friends.”
  4. When I cried at the Afton overlook because I wouldn’t have to commute for work anymore.
  5. Biscuit baking lessons on zoom with Jeremy and Amanda.
  6. The support each colleague gave when I needed it.
  7. The satisfaction that comes from seeing a student graduate as a DH practitioner, especially when you met them as a prospective student.
  8. Those who are gone. Ryan. Leigh. Scott. Rebecca. Effie. Stéfan. So many others for different reasons.
  9. All the unjust things. All the people working to make it better.

Nine things I’m grateful for

  1. Our students. They’re the best.
  2. Our colleagues. They keep me coming back.
  3. To still be here, doing this.
  4. Everyone who has taught me.
  5. Those who are still here.
  6. Those who made space for me when I burnt out.
  7. Eliza, Ben, Ava.
  8. That I was given a chance.
  9. Every accident that brought me here.

It’s not lost on me that so many others deserve to be in stable employment who are not. I’m very lucky to have a job in this world on fire. So, I will close with gratitude and a determination to pay it forward to the next folks in line.

  •